Page 1 of 1
Tin can engine almost runs
Posted: Sun Jul 22, 2012 7:20 pm
by sidmabb
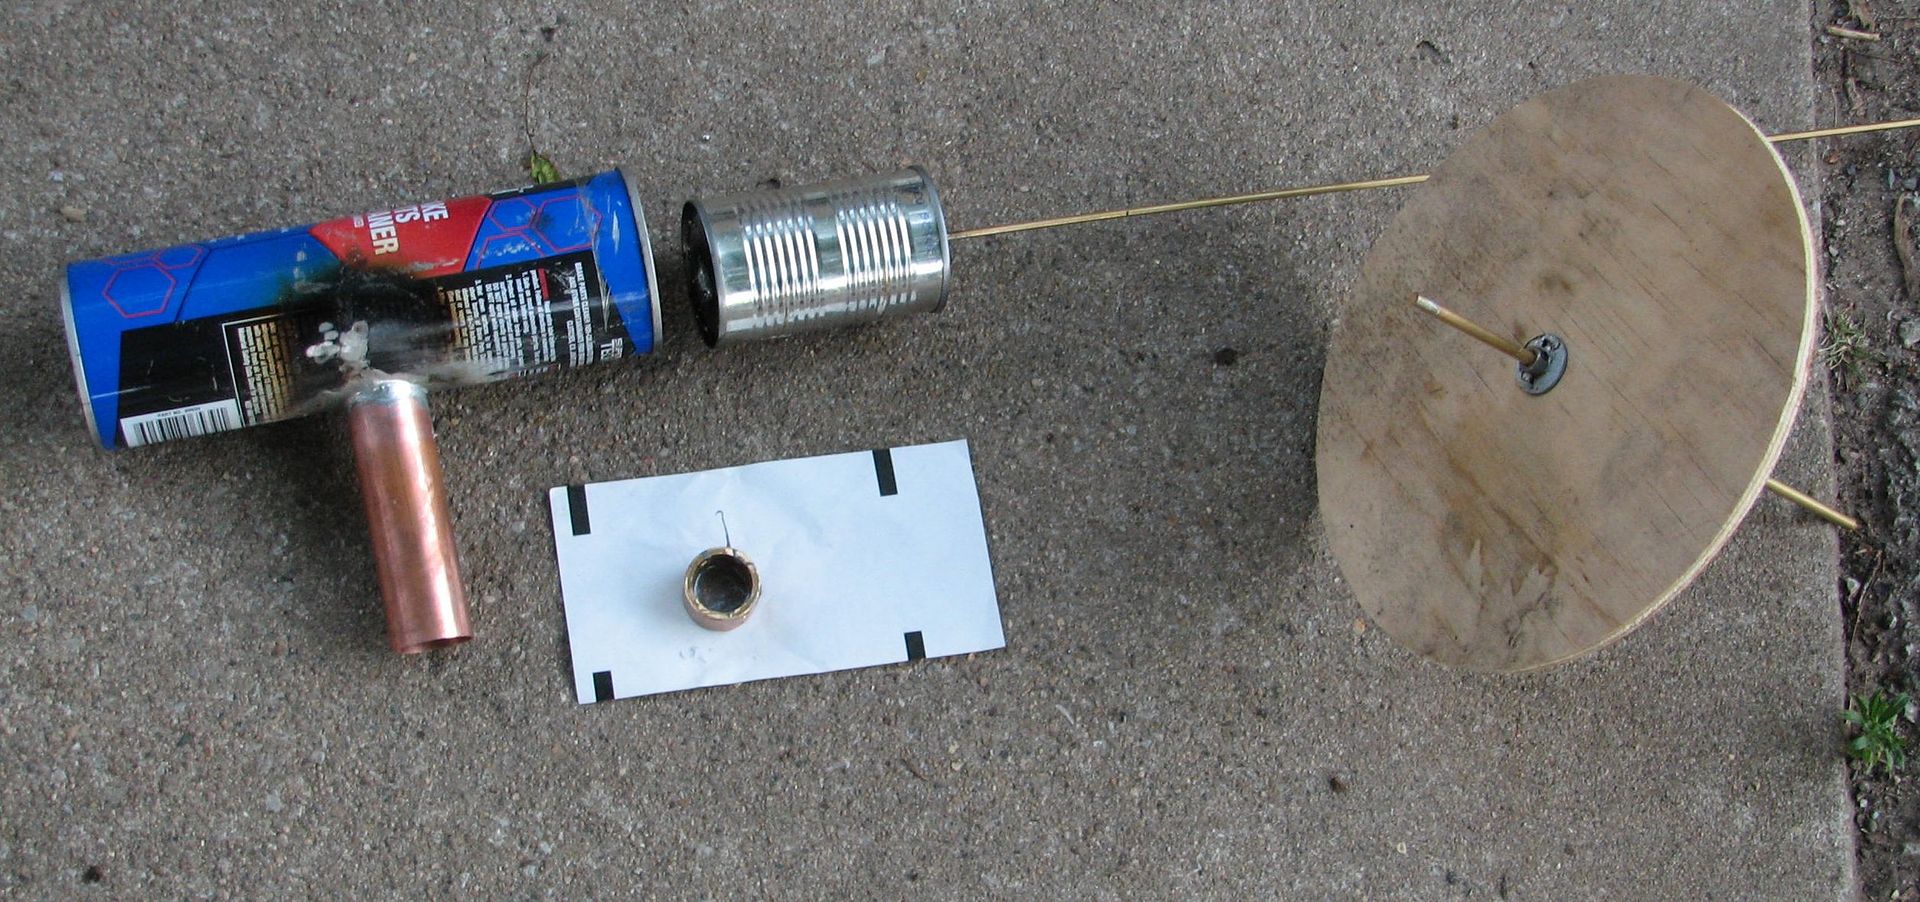
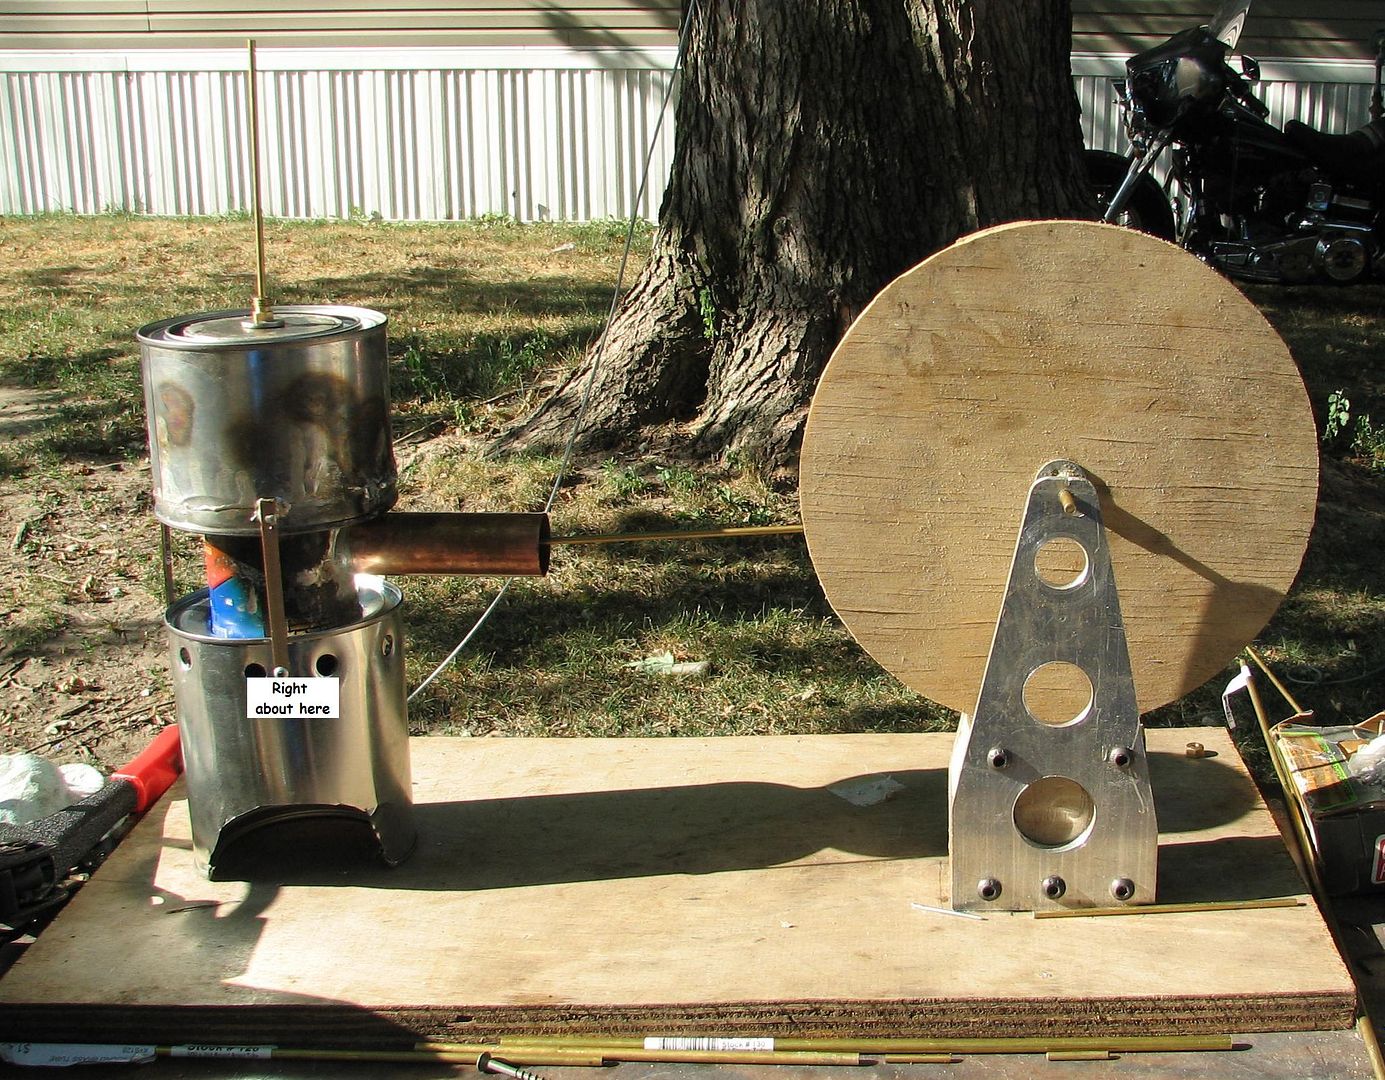
I attempted to build an engine from Darrel Boyd's design. I changed it up a little but same basic design. It has no noticeable friction but will not run. I played with the displacer timing and got it a little better. I changed the power piston from a heavy brass piston to a plastic one. Just so happens my glucose test strips come in a 1" OD vile with really thick walls.
Im thinking the displacer piston is to small. I am very new to all this and sure could use some help
Here is a video of it trying to run
http://s133.photobucket.com/albums/q63/ ... ovie-1.mp4
Re: Tin can engine almost runs
Posted: Mon Jul 23, 2012 6:00 am
by Administrator
Plastic, not so good when the unit heats up. Might be OK at the very first.
These engines are very fussy about friction. That is, all the joints and moving part have to be "loose", very loose. If the parts fit too tight, it will not work. This is the reason most of the engines don't work right off. Make it loose (but not sloppy). The power piston and piston cylinder need to be close, but not tight. It needs to be able to transfer the power without dragging, but tight enough to not leak down the sides. Oil the heck out of all the joint and the inside of the power piston cylinder and the rod going into the displacer with something like WD40 or a very light oil. Don't use heavy oil ! A lot of people have built this engine and email me with the same problem. It will work if built to specs.
What kind of heat source are you using?
When heated up, turn the flywheel in a counter clockwise direction (this is the direction it runs). Can you feel a “push” as the flywheel goes around? Or maybe a “pull” as it comes around? If so and it won’t run it is a “timing issue” The rods are slightly off dimention. It does not take much at all and it seems like some are fussier that others. You can try bending the rod that goes from the flywheel to the walking bead slightly and check it again.
Remember, this engine will not start on it’s own. When heating you have to give it a little turn counter clock wise to get it to start.
If it stop riight away there is another problem. If it seems to coast a little before stopping, it is probably a timing issue.
Most of the time they run for the first time right off the bat. But every once in a while one wants to be stubborn!
[hr]
Stirling engine test:
You can tell how much pressure you are building (or vacuum) in the displacer cylinder by doing this test
Remove the power piston connection rod. (the rod from the power piston to the flywheel) and let it just hang.
Place the power piston in the center of the power piston cylinder (half way).
“Rock” the walking beam to where the left side is down (displacer is in the lower position)
What we are going to do here is light the fire under the engine and after a short time “Rock” the walking beam where the left side is “UP” (displacer is in the upper position). This will immediately start to heat up the air in the displacer cylinder and build pressure. This will push the power piston outwards.
Immediately “Rock” the walking beam on the left side down and the air will cool in the displacer. This will create a vacuum in the displacer cylinder and that should pull the power piston back into the power cylinder.
If your power piston is not moving back and forth, you have a problem. If it is moving back and forth then you have a timing issue or too much friction. Or too much weight on the flywheel or somewhere.
If the problem is the power piston is not moving, then you have either a leak in the displacer cylinder or power cylinder, or your piston is too loose and the pressures are blowing by the sides of the piston. Another possible problem (less likely) is your piston is too tight. It should move very freely in the cylinder.
Darryl Boyd
Re: Tin can engine almost runs
Posted: Tue Jul 24, 2012 12:04 pm
by Junkie
From looking at the video I would say it looks like it's leaking air somewhere. It doesn't look like there is a lot of friction.
I can't say for sure though.
Re: Tin can engine almost runs
Posted: Wed Jul 25, 2012 4:27 am
by Ian S C
From what I see, I would check the displacer gland (where the rod comes out of the cylinder) there should only be a minute leak. Also check that the displacer its self has no leaks, take itand put it in a pot of hot water, and see if any bubbles come out of it, if it leaks, seal it. Power piston: how does it fit? it should just slide through the cylinder, and if you block the end it should stop, or very near to it. If possible run the piston dry, as oil causes drag, if you use WD-40 or similar you may have to clean it every now and then because it leaves a film that builds up. When you quickly pull the piston right out of the cylinder, it should come out like the cork from a pop gun, the bottom / top of the displacer cylinder will (possibly) make a clicking noise from the suction. Ian S C
Re: Tin can engine almost runs
Posted: Wed Jul 25, 2012 7:37 pm
by sidmabb
Thanks guys When I 1st checked the displacer piston it leaked around the rim of the can. I assumed soldering the rod melted out what ever the canning co used. I went around it with epoxy and forgot to recheck it but I think I will find another can and not solder it, use only epoxy to seal around the rod. Ive been using sewing machine oil. Will get some WD
When I made the top for the displacer cylinder I figured the second smaller piece was to keep the lid centered. I managed to leave a lip in the can so It self centered and there for only used 1 lid.
Its been to hot here lately to mess with it. maybe this week end.
Re: Tin can engine almost runs
Posted: Thu Jul 26, 2012 2:21 am
by Ian S C
You could dilute the sewing machine oil with a few drops of Kerosene (Parafin in UK), I have used Diesel as a lub.
The can makers don't think of us too much, the inside of the can is coated with laquer, or some plastic coating, it can make soldering difficult. Epoxy or similar is OK at the cold end, and it's best if you can design it so that the rod does not go through the bottom. Some cans can leak around the bottom seam after they have been heated and the plastic has melted out. Ian S C
Re: Tin can engine almost runs
Posted: Thu Jul 26, 2012 10:00 am
by sidmabb
Ian S C wrote:
The can makers don't think of us too much, the inside of the can is coated with laquer, or some plastic coating, it can make soldering difficult. Epoxy or similar is OK at the cold end, and it's best if you can design it so that the rod does not go through the bottom. Some cans can leak around the bottom seam after they have been heated and the plastic has melted out. Ian S C
On the 1st one I had soldered it , heated it and removed the rod and resoldered it so it endured a lot of heat. I think I can solder the new can with out getting the edge hot if I cool it right away. Then I will epoxy the top because when you heat it to solder it expanding air forcing out makes it hard to solder.
I am a little confused though. Why does it matter if the displacer piston leaks?
Re: Tin can engine almost runs
Posted: Thu Jul 26, 2012 3:39 pm
by sidmabb
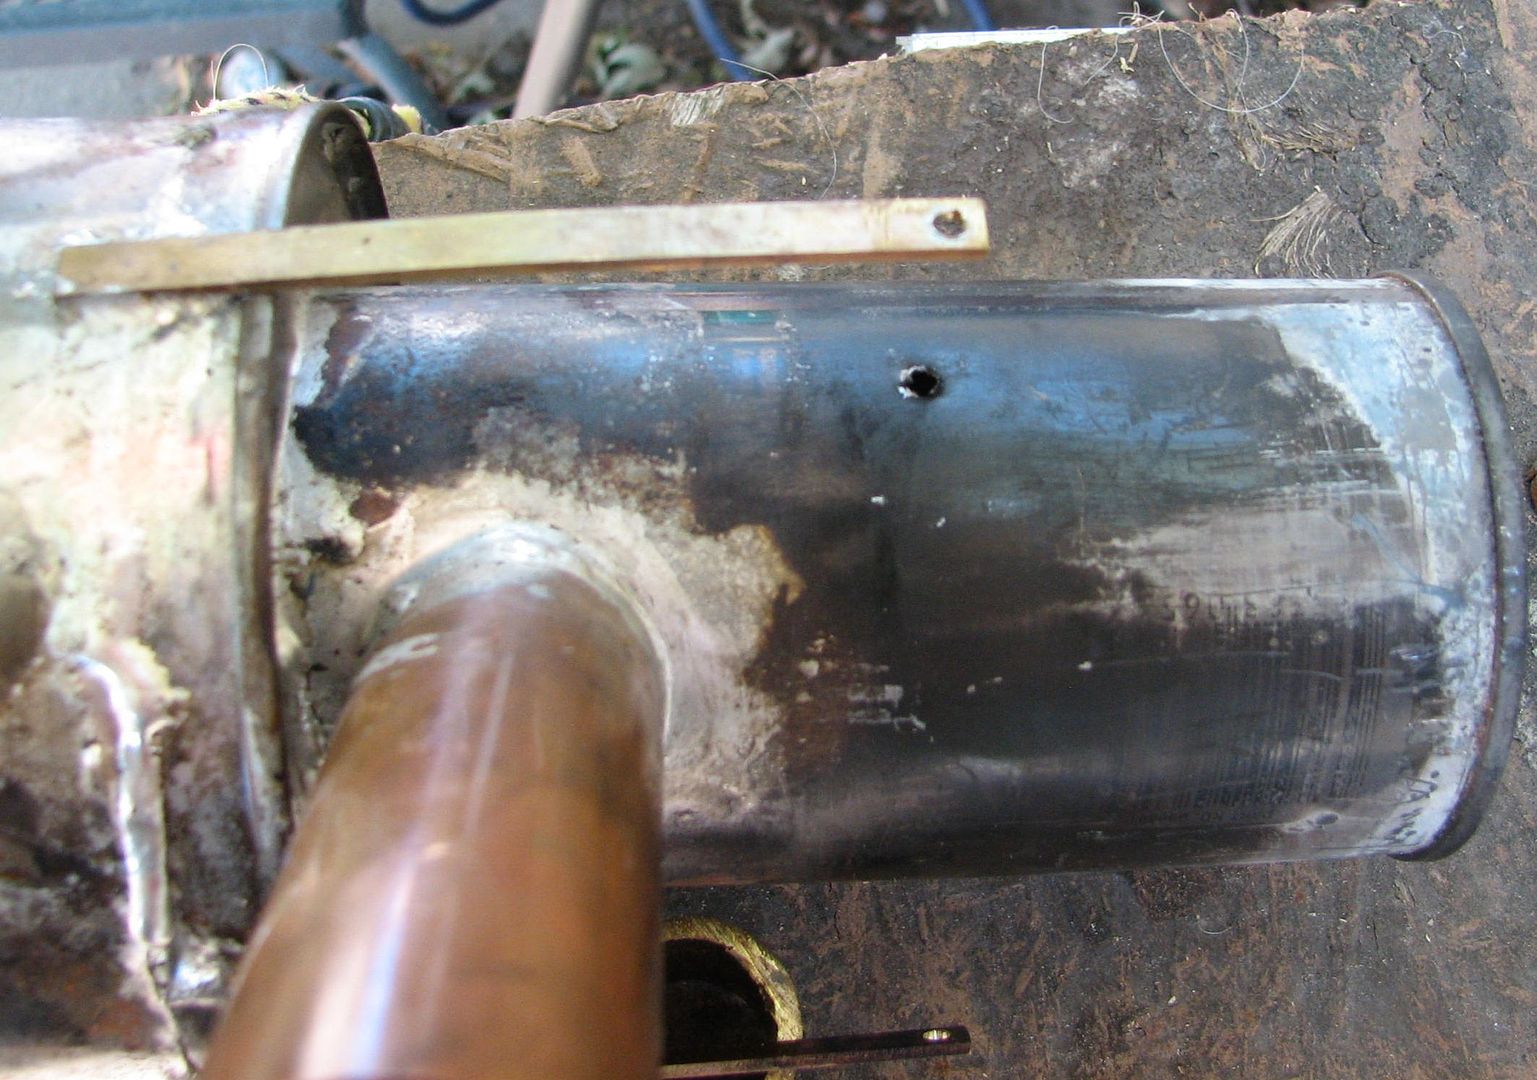
Well The displacer piston did leak in it but as I was cleaning up the cylinder I got a sinking feeling as I kept seeing a glint of light. Upon further investigation I found a hole below the top of the fire box right about where I had drilled through the fire box for a rivet. Maybe I should have done this before putting the cylinder and the fire box together. Wonder how that happened.
Re: Tin can engine almost runs
Posted: Thu Jul 26, 2012 9:22 pm
by Administrator
You went too deep!

That will do it!
Boyd
Re: Tin can engine almost runs
Posted: Thu Jul 26, 2012 9:48 pm
by sidmabb
Well I have a lot of left over brass rod but no flux. I guess I could try solder flux but I think I will grab some brazing flux. Dont have an oxy/Acetylene torch but will try propane
Re: Tin can engine almost runs
Posted: Fri Jul 27, 2012 4:38 am
by Ian S C
A wee soldering trick for sealed containers. Pierce a tiny hole a good distance from where the mainsoldering will be done, this lets you do the job without any problems. When you have finished and the work has cooled, take your soldering iron, and put a drop of solder over the little hole, job done. Ian S C
Re: Tin can engine almost runs
Posted: Sun Jul 29, 2012 5:24 pm
by theropod2
Ian S C wrote:A wee soldering trick for sealed containers. Pierce a tiny hole a good distance from where the mainsoldering will be done, this lets you do the job without any problems. When you have finished and the work has cooled, take your soldering iron, and put a drop of solder over the little hole, job done. Ian S C
... or make a small patch of the same material to be patched and spot solder/braze around the edges a little at a time so the heated air inside doesn't blow the solder/brazing out as it expands. In this case couldn't one just take out the power piston to let the expanding air a free path out?
R
Re: Tin can engine almost runs
Posted: Sun Jul 29, 2012 9:10 pm
by Ian S C
Theropod2, I was thinking more of the displacer its self as a sealed unit, your quire right about the displacer cylinder. The hole to be filled after the soldering is only just a pin hole so minimal heating of the surrounding metal is required.
Ian S C